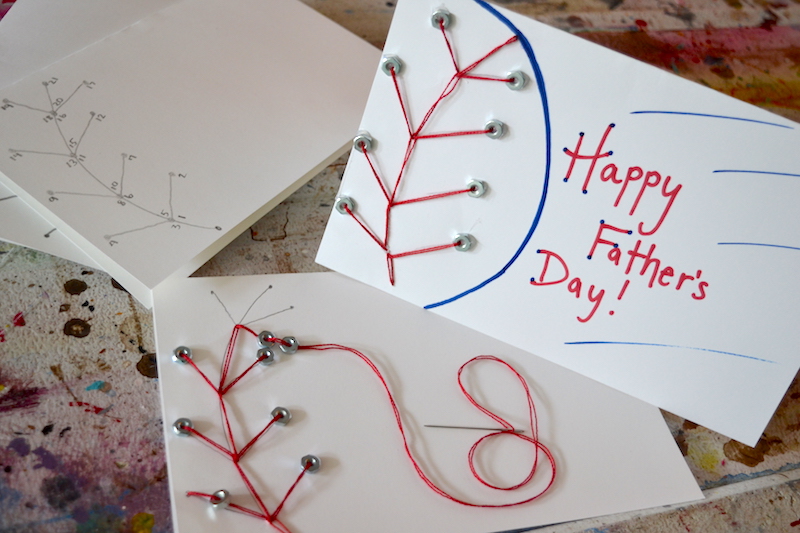
Dad’s are the TOUGHEST to shop for… so why SHOP when you can MAKE? These projects might appear intimidating at first glance, but rest assured, NO artistic ability is necessary.
See our full Good Day Columbus DIY segment here!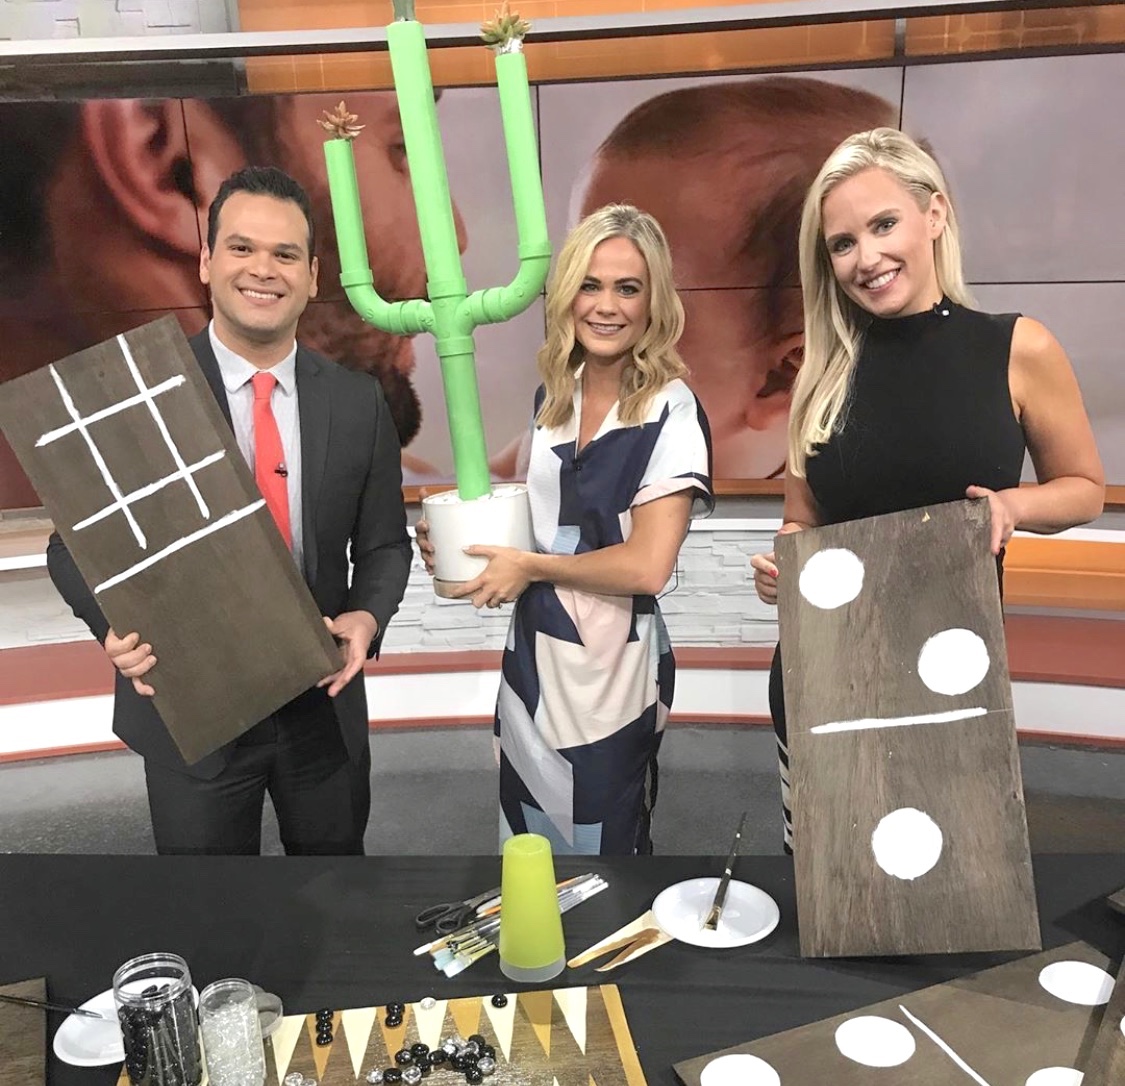
Supplies for PVC Pipe Cactus:
- Two 1.5″ [in diameter] pieces cut 14-16″ in length
- Two 1.5″ [in diameter] pieces cut to 4″ in length
- Two 2″ [in diameter] pieces cut to 24″ in length
- One 4-way connector (top and bottom holes should be 2″ in diameter, left and ride holes should be 1.5″ in diameter)
- Two .5″ elbows
- Green acrylic paint
- Hot glue and/or concrete
- Pot filled with stones or sand
- 3 mini-succulents (dirt included)
- 3 ziplock bags
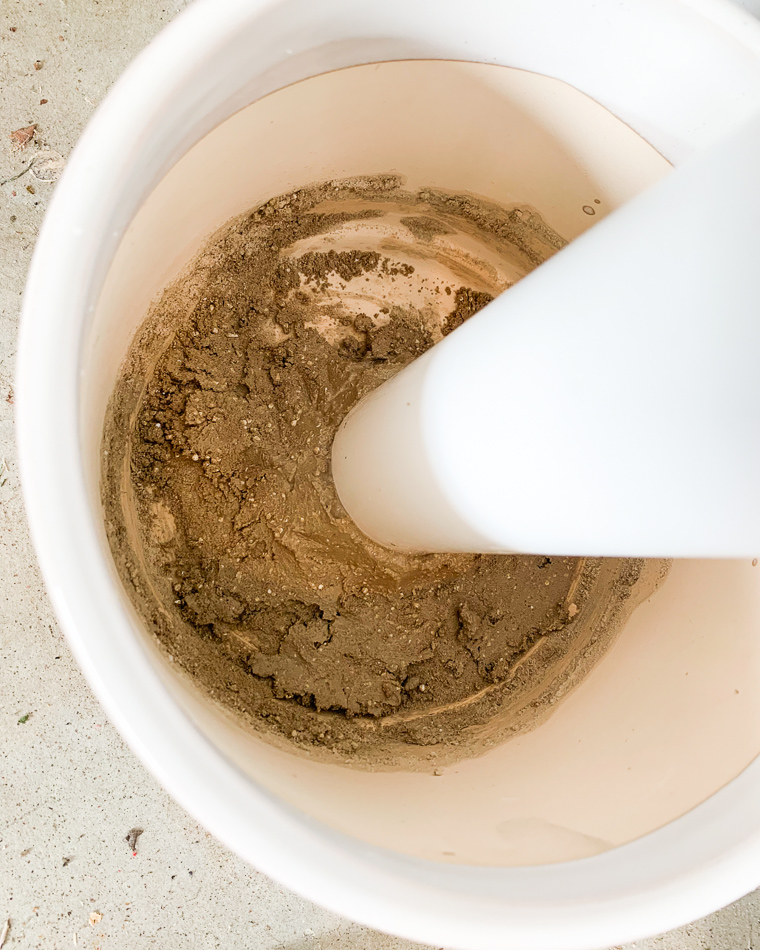
Step 1) Begin by connecting one of your 24″ larger pieces of PVC pipe to the bottom center of the pot. If you use hot glue for this, keep in mind you’ll need a LOT. The rocks or sand will help to keep it centered in place, but you don’t want to ever lift the cactus up by the pipe. It will easily tear off of the bottom of the pot, if the pot is heavy. Alternatively, you can use concrete like I did in the photo shown here.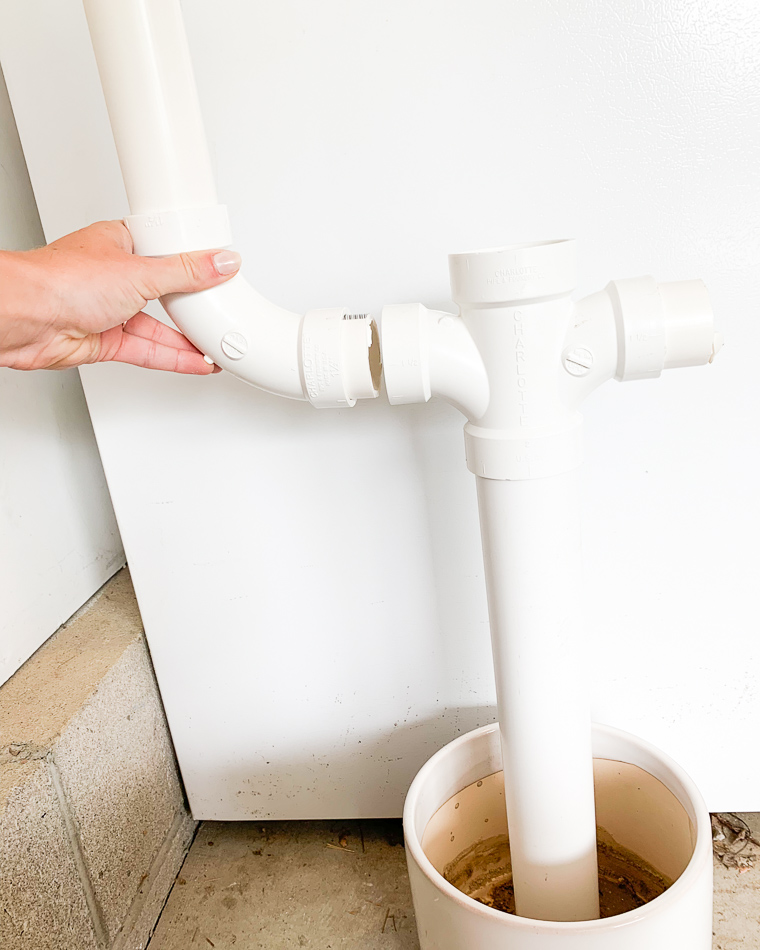
Step 2) Once dry and secure, add the 4-way connector on top of that piece, and then the other big pipe to the top of that. Like a puzzle, you can guess where we’re going next!
Step 3) Connect each of your 4″ pieces to the left and right sides of the 4-way connector. This will allow us to connect our elbows then. There might be a bit of space between the elbows and the 4-way connector exposing these 4″ pieces. That’s okay!
Step 4) Finally, you may now add the two smaller 1.5″ diameter pieces to each elbow. Our cactus has come to life! I posted this unfinished photo, and some of my Instagram followers thought I was making a menorah… so now I know what to make next December for all my lovely chosen peeps!
Step 5) At this point, the cactus is ready to be painted. Use any type of brush and some green
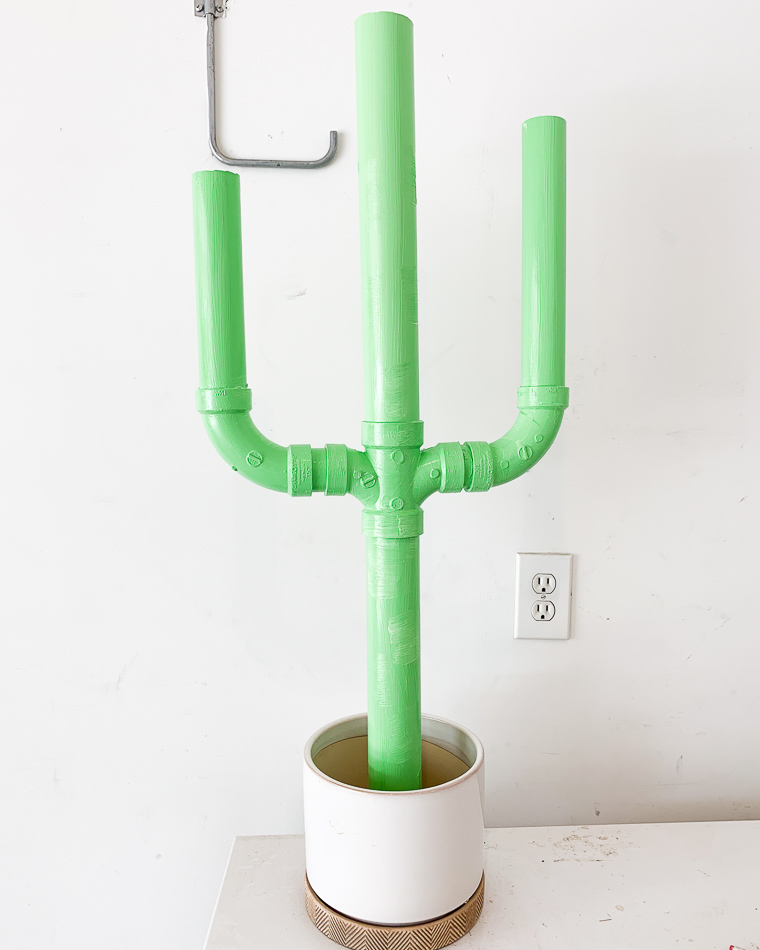 acrylic paint to cover the whole thing.
Step 6) Once dry, add your sand or rocks. If you plan on keeping this outside, the heavier the better. We wouldn’t want a wind storm or the rain to knock it over.
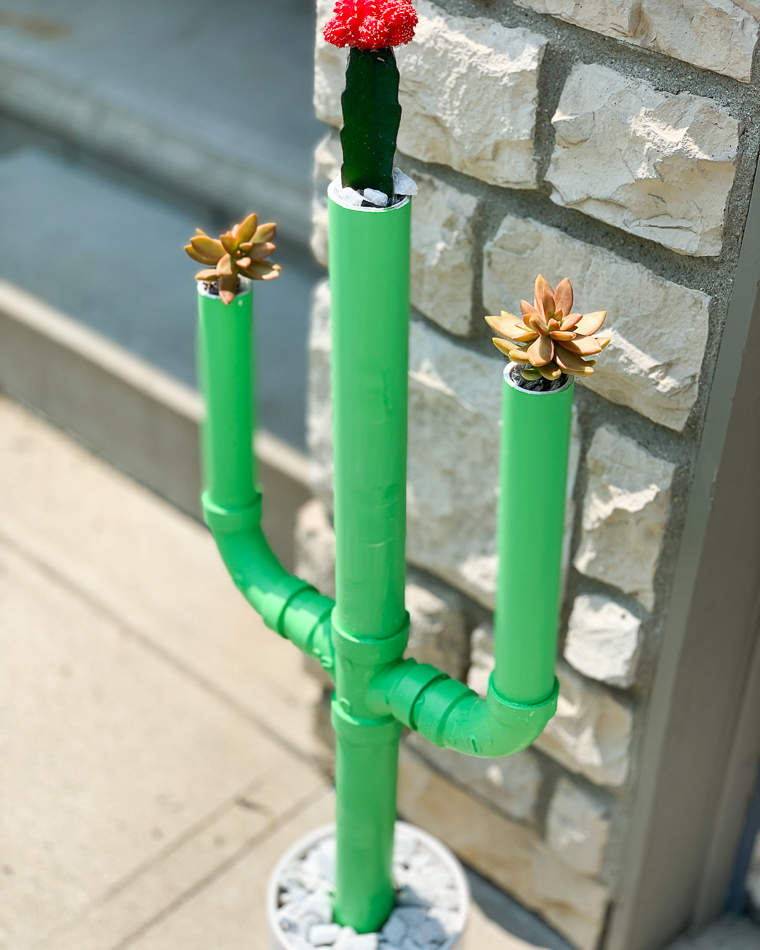
Step 7) Finally, you may be wondering how I got the succulents to not fall through the pipe. I simply cut the zipper part off of a plastic baggie. Then, I put the baggie inside the top of the PVC pipe and hot glued the inside edges to the inside of the PVC pipe holding it in place somewhat like a trash bag inside of a trash can! I made this up, so there may be other ways of doing this, especially if you find a mini pot that fits inside perfectly!
Step 8) Place/shove each succulent with a little dirt inside each bag.
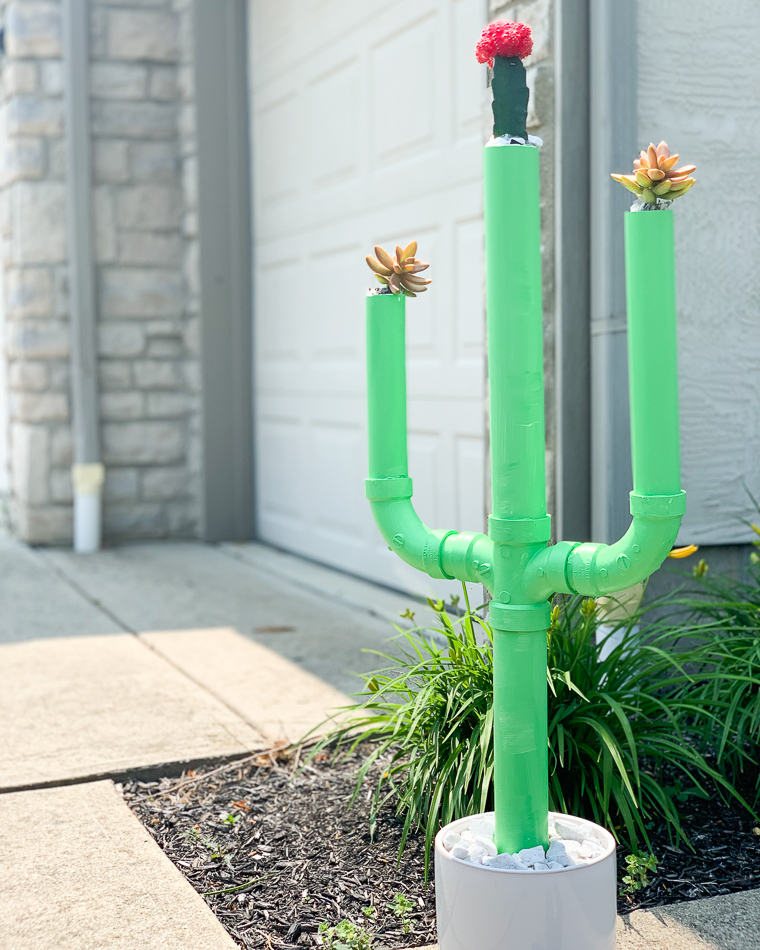
There you go! A cactus that you can touch without bleeding. 😉
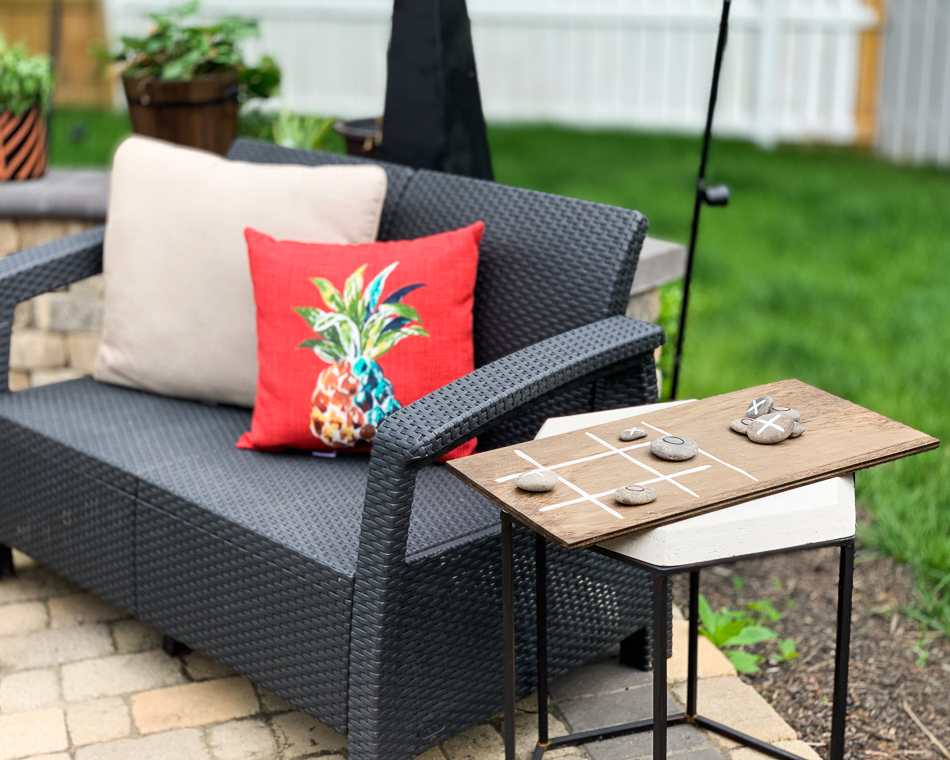
Supplies for Tic Tac Toe:
- One 24″x12″ plywood board (try to get one that has a nice grain to it)
- Stain (of your choice)
- Pencil and small paint brush
- White paint
- 10 stones
Step 1) Begin by sanding your board if necessary. Remember, they will pre-cut this board for you at Lowes or Home depot if you ask!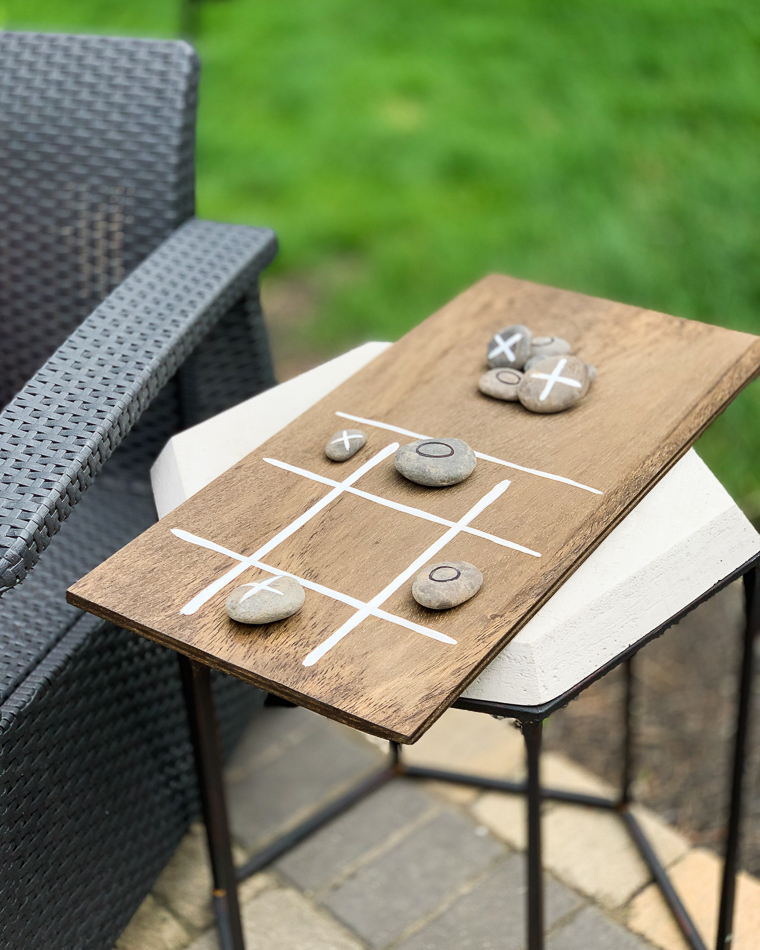
Step 2) Stain both sides and edges of the board. Repeat with another coat if necessary.
Step 3) Use a pencil to mark a line at the halfway point lengthwise, separating the board into two sides which are 12″x12″.
Step 4) On one of the squares, use a pencil to mark your tic-tac-toe (#) symbol. You can either measure this out perfectly into thirds both ways, or you can just wing it!
Step 5) Use your small paint brush and white paint to go over those lines you just marked. If you want to also go over the center line, you can, or just erase the pencil at this point. The other side of the rectangle board is just meant to hold the stones.
Step 6) Use your brush and white paint to mark X’s on 5 of the stones and O’s on the other 5. Once dry, you’re all finished!
Step 7) *OPTIONAL* If you plan to keep this outside in the rain, be sure to finish it with a waterproof polyurethane layer so that it doesn’t rot or get damaged outside.
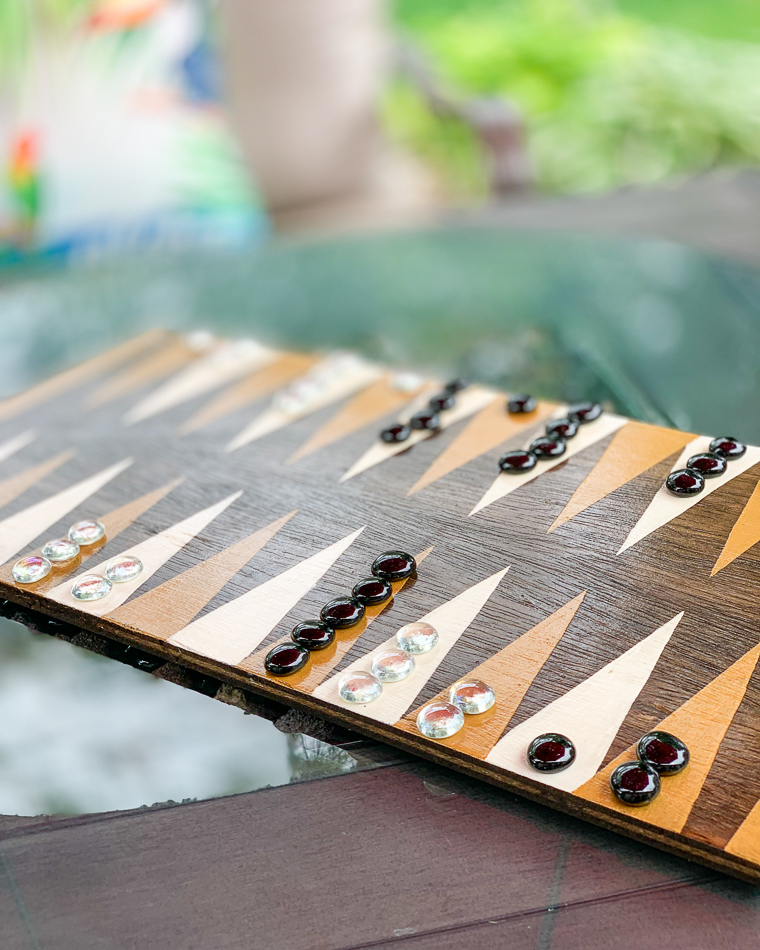
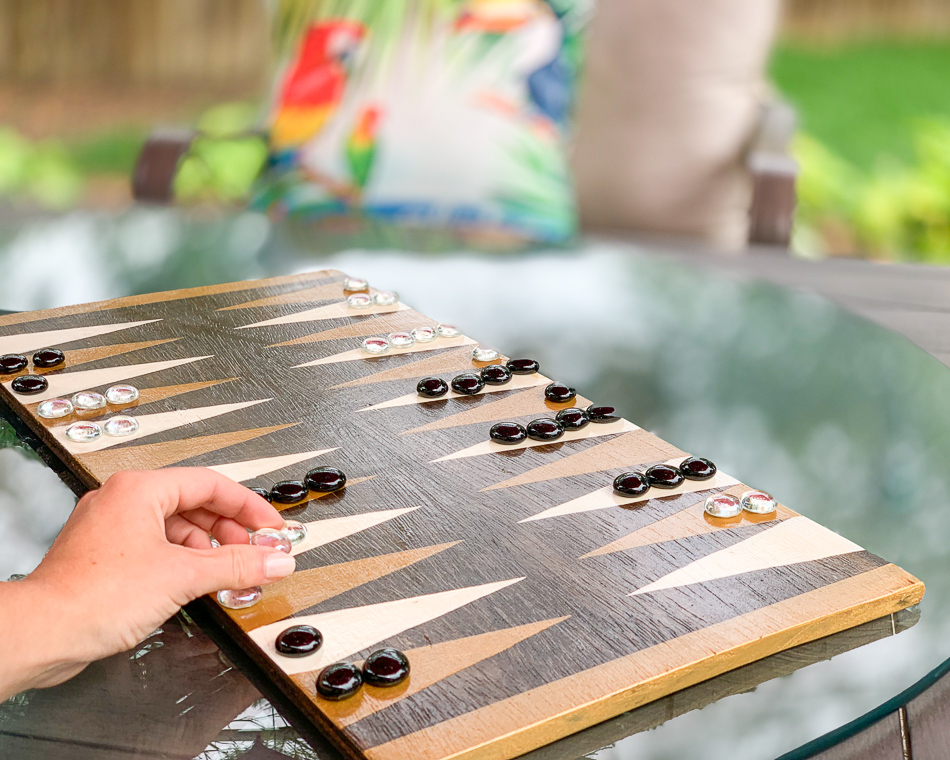
Supplies for Backgammon:
- One 24″x12″ plywood board (try to get one that has a nice grain to it)
- Stain (of your choice)
- Pencil and medium-sized paint brush
- 2 acrylic paint colors (for the triangles)
- Ruler
- Construction paper
- Scissors
- 2 different colored stone collections (available at Michaels or Wal-Mart)
- Clear polyurethane
- Fine grit sandpaper if needed for edges (we used 320)
Step 1) Begin by sanding your board if necessary. Remember, they will pre-cut this board for you at Lowes or Home depot if you ask!
Step 2) Stain both sides and edges of the board. Repeat with another coat if necessary.
Step 3) Once dry, use your pencil to mark on each corner 1.5″ inward from the short edge (this will give us 1.5″ on each end of the board for the pieces to bear off to the edge on the home base).
Step 4) Lengthwise, we now have 21″ to paint our 12 triangles on. This means we need to divide 21″ by 12 to find the width of the base of each triangle. This comes out to 1.75″, so you may
now mark a pencil mark every 1.75″ on both sides of the board lengthwise.
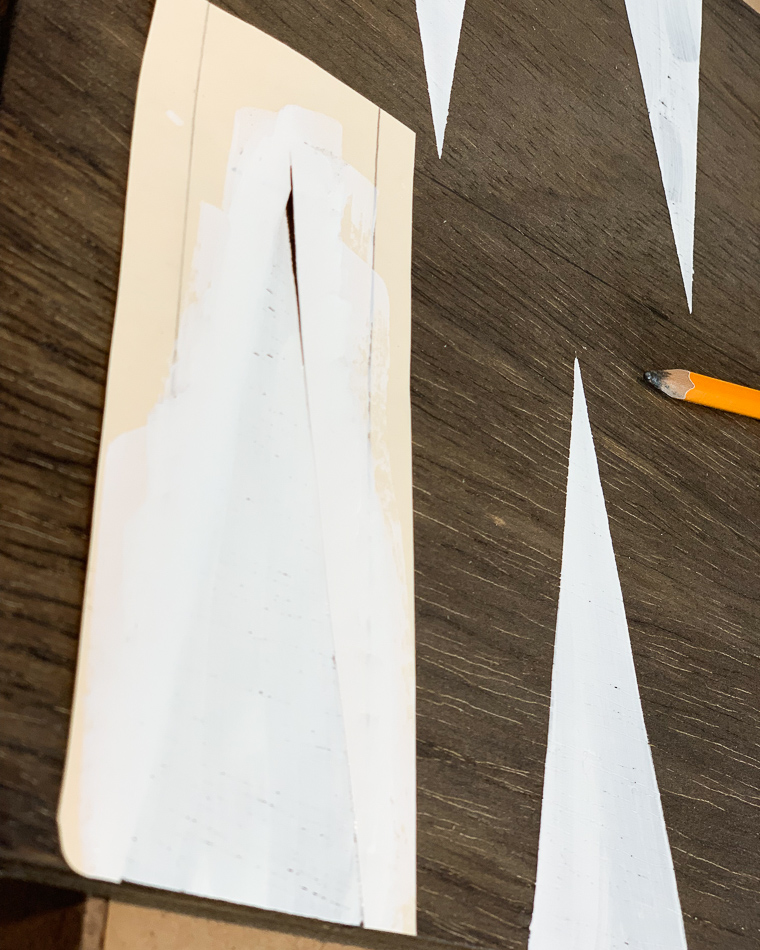
Step 5) Next, use a ruler and construction paper to cut a triangle stencil out. You’ll use this stencil to paint every triangle on, so be sure the base is 1.75″ just like you marked on the board. The triangle can be anywhere from 4.5-5.5″ tall (meaning measure that distance up from the base to create the point, but be sure the point is centered).
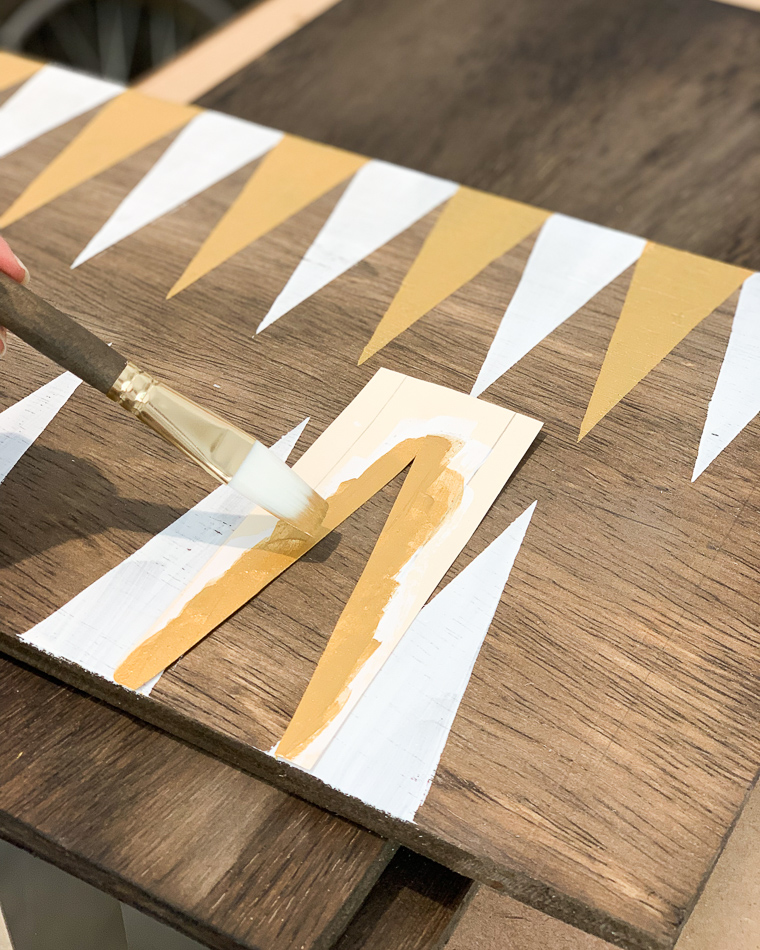
Step 6) Beginning with your first paint color, place the stencil on the board at your first triangle placement, and use your paintbrush and DOWNWARD brush strokes (from the tip of the triangle down), to gently fill it it. Then, skip a triangle placement, and continue to paint every other triangle this color. Flip the board to then paint the opposing side, but be sure that you are painting the triangles in between your previous placements (see photo).
Step 7) Once complete, let dry, and repeat with the other color filling in the rest of the triangle placements. You should have 12 triangles on each side (6 of each color).
Step 8) Be sure to coat your board with a waterproof polyurethane or shellac so that it is sturdy and withholds all of the activity!
Supplies for Yard Dominos: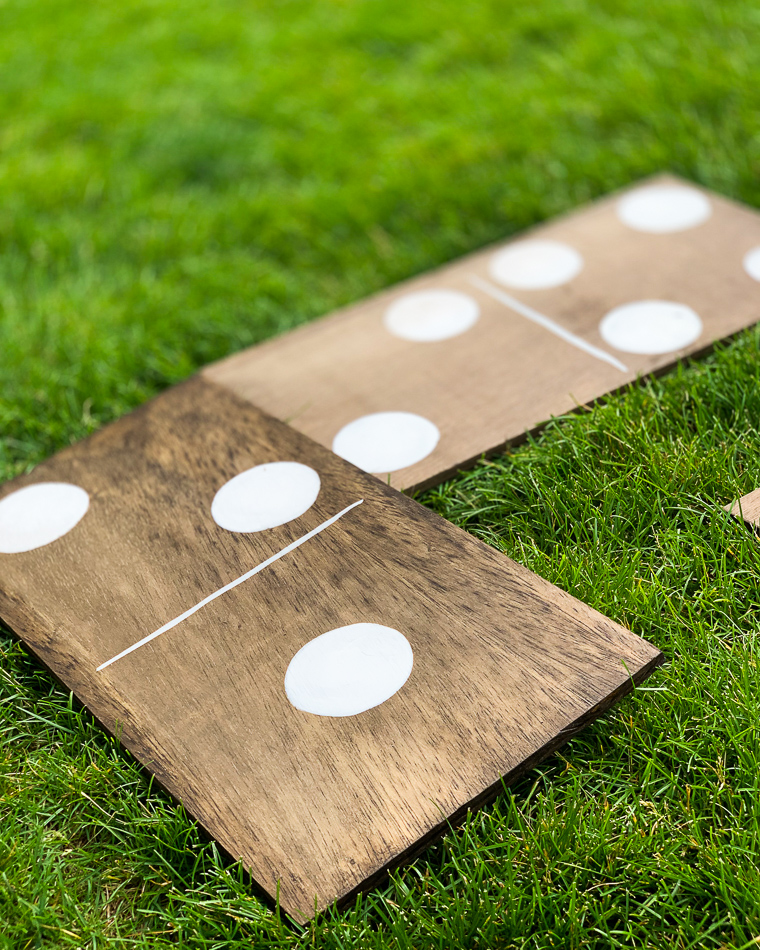
- Twenty-eight 24″x12″ plywood boards (try to get one that has a nice grain to it)
- Stain (of your choice)
- Pencil and medium-sized paint brush
- White acrylic paint
- Standard-size cup
- Polyurethane
- Fine grit sandpaper if needed for edges (we used 320)
Step 1) Begin by sanding your boards if necessary. Remember, they will pre-cut these boards for you at Lowes or Home depot if you ask!
Step 2) Stain both sides and edges of the boards. Repeat with another coat if necessary.
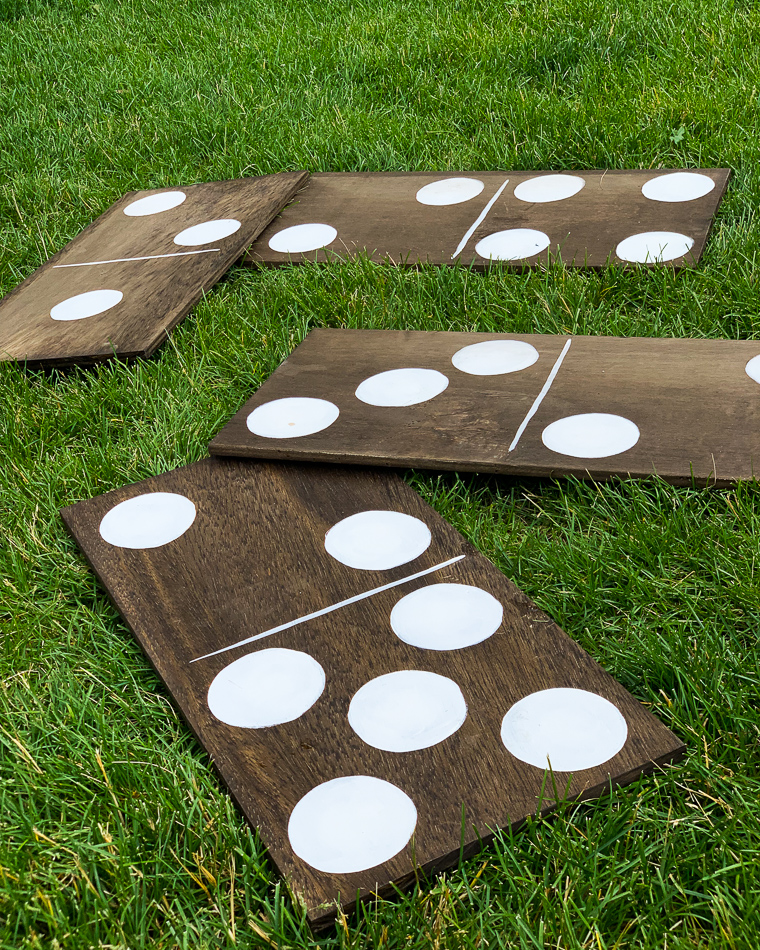
Step 3) Use your pencil to mark the 12″ line lengthwise on each board, dividing the board into 2 halves which are 12″x12″.
Step 4) Use white paint and a small brush to paint over that line on each board.
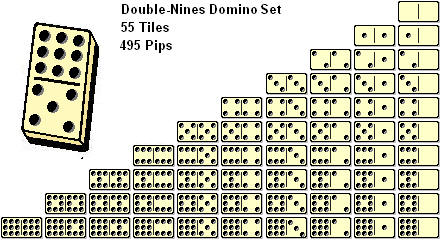
Step 5) Use your cup [upsidedown] and pencil to trace circles on each board that you’ll fill in with white paint to make the dominos. Below is a chart on how many tiles have which dots on them! Fill in with white paint, and enjoy!
Thank you for joining us in our Father’s Day DIY crafting. I had so much fun with our Good Day Columbus friends! See ya’ll next time, and Happy Dad’s Day!

